


As computers have become faster and digital storage has become greater we have increasingly turned to version control programs to manage our work files. A GREAT idea, and amazing in practice (I wish I could version things outside the computer too! Like kids!). However they can be tricky for some, and unintuitive for others.
I have made a simple script that helps work alongside some existing versioning programs or otherwise allows super simple to understand versioning to be automatic.
Why a TODO tool?
The concept is that, if you are already writing a todo list. Say on a piece of paper, or maybe even in Notepad on the computer already, there is no need to write it twice. Write it into the scene that it is relevant to, and it will always be there when you need it. You can also write TODO’s for others, send them your scene file, and when they open it they can complete the tasks.
The other benefit is one of momentum. When using a version control system you need to stop after each save and tell the system what it is you just did. This slows things down and can mentally take you out of the “zone”. Instead, simply clicking off a todo, and continuing to work is much more intuitive.
So lets get into it!
You can download the script here: todo
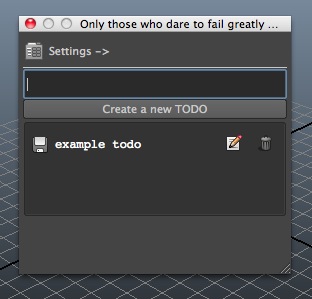
Using this script is fairly simple. First create a TODO by typing a shot task in the black box and clicking the button. It will appear below.
- Clicking on the Save icon or the actual text of the todo will save the scene and tick off the task
- Clicking on the pencil icon will edit the todos text.
- Clicking on the trash icon will remove the todo WITHOUT saving the scene or ticking it off.
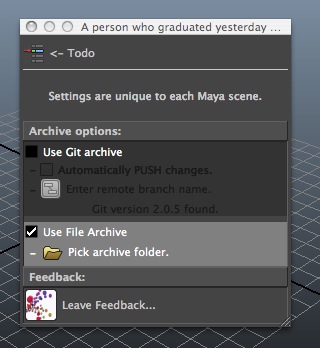
In the settings screen you have a few different archive options. Each option ticked will determine where and how your scene gets saved each time you complete a task. Different options may become availible if you have different tools installed on your machine (such as GIT or AMP), however you will always have the option of a “File Archive”.
Tick the File Archive box to use it, and click the folder icon to pick a folder for archives. Once ticked, each and every TODO task that is completed will cause a new saved file to appear in that folder. Named appropriately. If you ever need to go back to a previous version of your working file, you can simply un-zip the desired file from the archive folder, and replace your working file with that one.
When working with GIT or AMP and saving the file, it will check the file into the appropriate program, setting the comment as the todos text for you.
Here is a video demonstrating installation and AMP usage:
Advanced Stuff
There are a few little hidden extras that come with the tool. It accepts certain keywords for additional functionality and has a third utility button that will appear on a Todo when needed.
- Todos accept hashtags. So a bunch of todos with “#blocking” will all be placed in a section named blocking.
- Save same is true of tokens. If the first word in the todo is “blocking:” for example, it will also end up in the blocking section.
- Todo treats numbers as though they are frame numbers, and gives you a convenient utility button to quickly take you to that frame.
- Todos with frame ranges ie “fix issue from frames 45 to 60” will result in a range utility button, quickly taking you to that range.
- Same is true of website URLs in the Todo. A button will open the URL in a browser.
- If a file is used in the shot in some way, and the filename is in a Todo, a utility button will appear that loads the file.
- Likewise if a relative path to the file (from the open scene) is given, or an absolute path. The same utility button will appear.