


Phew… made my second script for Maya. This one was a bit complicated. So lets get into it…
Download:
This script is actually three scripts. spacesGUI.py, spaces.py and smartselection.py. The Spaces script handles all the functions dealing with Spaces, for use in scripts or hotkeys (explained later, use in your own scripts!). Meanwhile the GUI script is a UI that uses some functions in the Spaces script. The smart selection script just deals with making selections. Some other scripts I’ve made share that file. Make sense? No? READ ON!
What in the world are Spaces?
In computer animation we use curves to represent values, which in turn represent positions in space. As animators we have varied tools to manipulate them, utilising Tangents and Keys. Keys of course fixing a point on the curve, and tangents filling in the space between. What is missing is some sort of macro control. Something that controls the curve at a higher level.
Enter Spaces.
From an artistic point of view Spaces refer to the curves between two important Keys. The keys could be extremes/golden poses/breakdowns/doesn’t matter. What is important is that the keys need to be where they are to tell the story. Typically tangents define the space between the keys and in a lot of cases they work fine. But they are limiting. They can only make a nice slope from one key to another, and in order to get any shape more complicated you need to add in another key. A key that exists only to shape the curve.
So within the scope of this script, a Space is the section between two important keys, INCLUDING any other keys that exist there purely to shape the curve. Kind of like advanced tangents.
From a technical point of view. The script deals with Spaces as any gap between two REGULAR keys, while any BREAKDOWN key is assumed a part of the Space itself. So to make a space readable by the script, all you have to do is convert your extra keys to breakdowns.
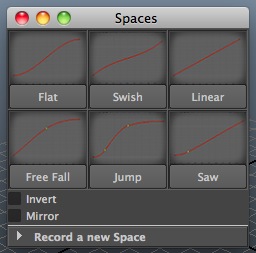
SPACES GUI
Lets start with the GUI.
The GUI is there to showcase and provide some simple functionality of the Spaces script. It should stand to reason then that this script file relies on spaces.py and can’t operate without it.
Invoke this GUI with this code (you can set it up as a shelf script/ hotkey / or just put it into the scrip editor in Maya):
import spacesGUI
spaceGUI.GUI()
This will run the UI script pictured above.
Curve Buttons
-
The first thing you’ll notice are the Space curve buttons. These buttons place the pictured curve into your Space. To use it, simply select an object with animation. Move your time slider between two keys you’d like to modify and click on a Space. It will insert the shape into your space on all Spaces that fall within the selection (selections explained in spaces.py ). The curve will fit itself to your keys values and time range.
-
If you desire, there is an invert checkbox below the Spaces buttons. This will flip the curve. Useful if you’ve got a curve that moves up and down (like a bouncing ball) and you need to reverse the shape. While checked, any Spaces shaped by pressing their buttons will be put in backwards.
-
Below the invert check is a mirror check. This will place two copies of the curve in the Space back to back.
-
To the side is an experimental “preserve spaces” checkbox. When ticked it will prevent you from selecting breakdown keys in the graph editor, and will attempt to keep spaces consistent when moving keys around in the graph editor. I’ve put the experimental label on it, as it can be a bit slow with massive selections. If you want to select a large chunk of keys with many different objects and channels be sure to turn it off.
Make your own Space
- Below the checkbox is a dropdown depicted “Record a new Space”. Clicking this will bring up the recording secion of the GUI. Here you can create your own Space shape and add it to the list.
To do this, create a curve shape on some animated object. Select all the keys you want to be saved and to into the GUI menu (on a single curve). In the textbox, fill in a short name to identify the curve. This name must not exist already. It also can’t be the name ‘custom’. Name it something easy to remember that describes your curve.
Hit the HUGE “Record Space” button to save the Space. You’ll get a message above the textbox if successful. Then to see the Curve in the list, close and reopen the GUI window.
- To delete a curve, type its name into the textbox and hit the tiny “Delete Space” button. You’ll get a confirmation message above the textbox if deleted. Close and reopen the GUI to refresh the list. You can delete the default curves if you wish.
Extra Info
-
In the scripts folder a new file will appear. Space_Data.txt This file stores your Space curve library. You can back this file up if you wish, or you can delete this file to go back to nothing but the default curves. You can also modify this file if you’re familiar with json, and change values on your stored curves directly.
-
In the scripts folder you also would have copied a folder named spaceGUI_icons. This folder houses the icons displayed for the default curves, but you can also make icons for your own custom curves. There is a photoshop file inside the folder that houses the template. So long as the name of the file matches the name given to the curve, it will be used as an icon.
That about does it for the GUI, now onto the…
SPACE CLASS
The space class houses a bunch of functionality for dealing with Spaces. Import it into your scripts or hotkeys using:
from spaces import *or if you’re worried about naming:
import spaces as spNow you can access its functions.
Data Types
Before we delve into the fuctions. I’m going to take a quick aside to go over the data types. Space() using two data types. Selections and Keysets.
Selections
- Selections are made up of two dictionaries and a list. Object -> Attribute -> Keys. When passing a selection to the Space class, it will work out the Keys for you, all you need is an empty list. e.g.
new Space( { 'pCircle1':
    { 'translateX':
        []
            }
        }
    )
This will force a selection on the X translate of pCircle1.
-
Adding a value to the Time variable when initialising the class will force it to operate at that time. As if the time slider were there. The time can be located anywhere inside the Space you want to select, but it’s programatically easier to have the time be equal to the first keyframe.
-
If you omit any selection Space() will attempt to find a selection by itself. Running through a priority order, using the timeslider as its basis for selection.
- We look for any curves selected, by having keys highlighted in the graph editor.
- We use any curves visible in the Graph editor.
- If the graph editor is not open (be careful, it can be open and minimised), we look to anything highlighted in the channelbox
- If nothing in the channelbox, we attempt to select everything.
- If no items are selected, OR the timeslider doesn’t fall on any curves, we throw a message explaining no selection to be found.
Keylists
- Keylists are the data being moved into and out of Space(). Use keylists to add keys, using the insert() command. Retrieve keylists using the extract() command.
The keylist is made up of two lists. keys and a list of keys. The keys are in the following format:
[ time , value , in angle , out angle ]-
A valid keylist will have at minimum two keys. The time and value of the FIRST key will be 0.0 The time and value of the LAST key will be 1.0
-
The in angle of the first key, and the out angle of the last key don’t matter. Best to leave at 0.0 for clarity.
An example keylist would therefore be as follows:
[ [0.0,0.0,0.0,0.0],[0.5,0.75,45.0,45.0],[1.0,1.0,0.0,0.0] ]This will make a parabola curve in the space.
Spaces Functions
You can use these functions in a script. Or even in a hotkey. Some functions (inbetween) are particuarly useful in hotkeys.
new Space( time (float / optional) , selection (SpaceSelection type / optional) )- Creating a new instance of the Space class causes it to find a selection of Spaces if not provided (above). These spaces will be worked on for the remainder of the class’s life.
version()- A simple function that will output the version name. Could be useful.
highlight()- This will highlight every key selected by Space().
clear()- Will clear out any keys within any selected Space. This refers to the breakdown keys.
scale( timescale (float / optional) , valuescale (float / optional) )- Scales all selected Spaces by the values given. Both values are optional. Omititng both will cause it to scale to a value of 1… kinda pointless, so might as well have at least one value in there. ;)
insert( keylist (Keylist type) )- Inserts keys into every selected Space based on the provided Keylist. The Keylist format is described above.
extract( shortlist (boolean / optional) )- Outputs the values of the keys in the selected Spaces. Shortlist is optional. When it is on, the output will be a single Keylist based on the first selected curve in the selection. When it is off (default) the output will be a “selection” output (as explained above) with Objects and Attributes before the Keylist. ie: Object->Attribute->Keylist
inbetween( frames (int / optional) )- Adds or remove an inbetween (or more) to the selection at the location of the timeslider (or a specificed time, if the class was created with one). Frames variable is optional, however if omitted it will default to 1. To remove an inbetween place a negative number. The nice thing is that the space gaining or losing inbetweens will keep its relative curve shape throughout. You cannot have a frame number in the negatives higher than the time length of the selected space.
A nice useage of this is to wire up hotkeys to “-“ and “=” with the numbers -1 and 1 respectively. ie-code:
import spaces as sp
sp.inbetween(-1)jump( frames (int / optional) )- Returns the frame time of the next or previous key ignoring breakdowns, by how many numbers you give it. For instance Space().jump(3) will return the time three keys ahead. Space().jump(-1) will return the immediate key previous. etc etc.
A useful hotkey for this to jump to replace the previous or next key hotkeys ( < > ) (using 1 and -1 for next and previous):
import spaces as sp
cmds.currentTime( sp.jump(1) )
Or an alternative version that works without triggering the undo:
import spaces as sp
cmds.undoInfo( swf = False )
cmds.currentTime( sp.jump(1) )
cmds.undoInfo( swf = True )
So there you have it
If you want to use this script. Go right ahead. If you want to use its functionality in your own scripts, go for it. Just drop me some credit. :D